
Z sometimes gets left out a bit on the whole scrapping thing, I suppose it is being the younger, or that fact that I work fulltime now, or something, but I do sometimes feel guilty for the fact his book is smaller or he has no minis of his own. So I made this fir his birthday 2 years ago, when I was laid off…. It’s also weird to see how my studio has changed, but that’s another story….
I generally like 10-12 pictures total for the minis I make, not sure, it just seems to be a goodly number. So here I have them laid out in the order I want them to be.

I then trimmed them to the size I wanted for the book, which was 4x4”. The book is 4x6 made from scrap chipboard I have on hand. I tend to save the backs of paper packs, notepads from work, or anything else that has the natural, non-bleached color. If you are concerned about acid, spray them first. I do not. So here you see my stack of chip and the trimmed photos, still in order.


I used coordinating paper from a DCWV stack, the text paper has “friends” words on them and liked that since this book is about them growing together as brothers.

I tend to be somewhat methodical about how I put everything together. Here you can see I have the photos on the paper that will be that page, and I’ve started to go through and decide what embellishments I want to use for each page & have laid them out accordingly. Notice nothing is adhered down, in case I change my mind. Sometimes I make my own, which is what I’m doing here, I wanted a star & I didn’t have one, so I made it & then covered it with patterned paper. I find it easier to embellish each page prior to adhering it to the actual page in the book. I can see the flow better & it allows for no prongs sticking out….

Once I do start adhering to the pages, I find using a brayer or some sort of roller really helps squash down the adhesive to get a firm grip. In this case, I know he’s pretty rough on stuff so it’s a bit more important.

I did sand the edges of the pages. For this I just have a foam sanding block that I use. I like it because it will fit to the contours. I just keep wrapping new sandpaper around it as I need to. A glue dot will keep it together. Also nice because I can adjust the grit as necessary. This is the cover, and you can see my practice journaling in the background too.

The last step is to punch the pages & bind it all together. These things do have a thickness maximum so sometimes I have to do the picture page separate from the core page. And then in this case I just used a scrap of a binder I kind of like the incomplete look.

So here you can see it all together….
I generally like 10-12 pictures total for the minis I make, not sure, it just seems to be a goodly number. So here I have them laid out in the order I want them to be.

I then trimmed them to the size I wanted for the book, which was 4x4”. The book is 4x6 made from scrap chipboard I have on hand. I tend to save the backs of paper packs, notepads from work, or anything else that has the natural, non-bleached color. If you are concerned about acid, spray them first. I do not. So here you see my stack of chip and the trimmed photos, still in order.


I used coordinating paper from a DCWV stack, the text paper has “friends” words on them and liked that since this book is about them growing together as brothers.
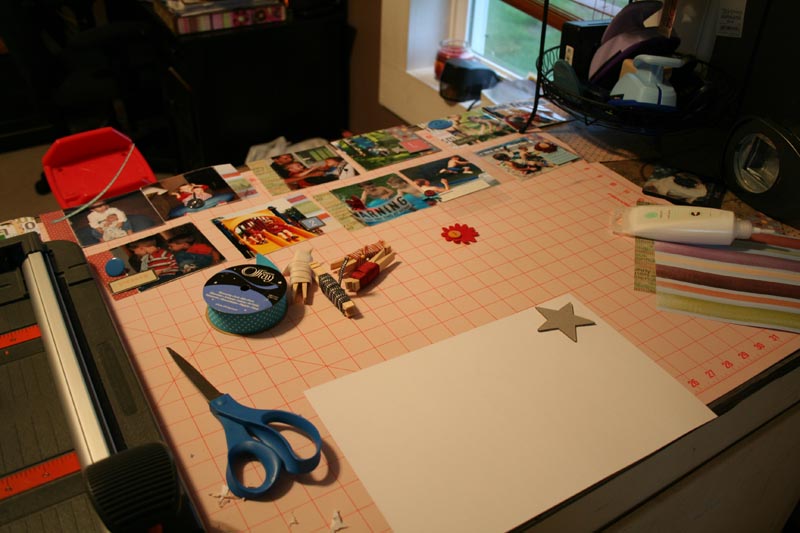
I tend to be somewhat methodical about how I put everything together. Here you can see I have the photos on the paper that will be that page, and I’ve started to go through and decide what embellishments I want to use for each page & have laid them out accordingly. Notice nothing is adhered down, in case I change my mind. Sometimes I make my own, which is what I’m doing here, I wanted a star & I didn’t have one, so I made it & then covered it with patterned paper. I find it easier to embellish each page prior to adhering it to the actual page in the book. I can see the flow better & it allows for no prongs sticking out….

Once I do start adhering to the pages, I find using a brayer or some sort of roller really helps squash down the adhesive to get a firm grip. In this case, I know he’s pretty rough on stuff so it’s a bit more important.

I did sand the edges of the pages. For this I just have a foam sanding block that I use. I like it because it will fit to the contours. I just keep wrapping new sandpaper around it as I need to. A glue dot will keep it together. Also nice because I can adjust the grit as necessary. This is the cover, and you can see my practice journaling in the background too.

The last step is to punch the pages & bind it all together. These things do have a thickness maximum so sometimes I have to do the picture page separate from the core page. And then in this case I just used a scrap of a binder I kind of like the incomplete look.

So here you can see it all together….


